Surtout pour les mariées - Beau bouquet pour les mariées. Faites aussi la décoration -


Cette gurl a finalement terminé le bouquet de mariage. La mariée aime.
Beaucoup, beaucoup de fleurs au crochet de la main. Un bas, quatre de plus pour aller!


MISE À JOUR:
Pour ceux d'entre vous qui ont demandé comment je l'ai fait, je coupe une boule de styromousse en deux, puis couvert dans la dentelle en utilisant un pistolet à colle chaude. Je couvrais aussi un cône de styromousse dans la dentelle.
Patterns pour un couple des fleurs sont ici et ici.


La petite de cinq pétale de fleur (mon préféré) modèle est:
Faire un anneau magique.

 
Dans le ring: 1SC, CH2, 2DC, CH2, 1SC, * CH2, 2DC, CH2, 1SC *, répéter de * à * 3 fois de plus. SLP ST dans l'anneau et la fixer au large. Tirez fermement le ring. Je viens noue les extrémités à l'arrière et une coupe.
Le motif de feuille est:


CH 8. En deuxième CH à partir du crochet, SC. Dans la prochaine CH 1 HDC. 1 DC à 3 suivant CH. Dans CH prochaine, 2 HDC. En dernière CH 1 SC. Tourner à crochet sur l'autre côté de la feuille. 1 SC dans le dernier CH vous venez de SC. Dans prochaine CH 1 HDC, 1 DC en 3 suivante CH, puis un HDC dans le prochain CH et 1 SC dans le dernier CH. Briser le fil.

Je l'habitude repères de la boule blanche pour fixer chaque fleur sur la boule de styromousse.
Puis je coupe différents types de dentelle et chaude collé que sur le cône.
Je l'habitude différents poids de fils, même fil à broder, et des crochets pour les fleurs pour obtenir différentes tailles.
Ceci est un grand héritage à transmettre et utiliser aussi comme une décoration!

Beautiful bouquet for brides. Make also as decoration - Buquê bonito para noivas. Use também como decoração


This gurl finally finished the wedding bouquet.  The bride loves it.
Lots and lots of hand crocheted flowers.  One down, four more to go!

UPDATE:
For those of you who've inquired how I did this, I cut a styrofoam ball in half and then covered it in lace using a hot glue gun.  I also covered a styrofoam cone in lace.
Patterns for a couple of the flowers are here and here.

The small five petal flower (my fave) pattern is:
Make a magic ring.

Into the ring:  1SC, CH2, 2DC, CH2, 1SC, *CH2, 2DC, CH2, 1SC*, repeat from *to* 3 more times.  SLP ST into ring and fasten off.  Pull the ring tight. I just knot the ends on the back and cut.
The leaf pattern is:

CH 8.  In second CH from hook, SC.  In next CH 1 HDC.  1 DC in next 3 CH.  In next CH, 2 HDC.  In last CH 1 SC.  Turn to crochet on the other side of the leaf.  1 SC in the last CH you just SC in.  In next CH 1 HDC, 1 DC in next 3 CH, then one HDC in next CH and 1 SC in last CH.  Fasten off. 

I used white ball pins to attach each flower onto the styrofoam ball. 
Then I cut different types of lace and hot glued that onto the cone.
I used different weights of yarn, even embroidery thread, and hooks for the flowers to get different sizes.
This is a great heirloom to hand down and also use as a decoration!

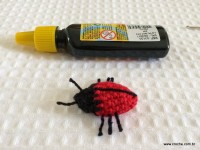
Ladybug Step By Step - Aprenda a fazer uma joaninha passo -a - passo


Today I will teach how to fabricate  crochet's LADYBIRDS . This model is pretty much in pieces with applications. When looking at the ready pet many imagine to be very difficult to do and end up giving up ... but it is very simple and quick to fabricate the ladybug , we will work ?

 - Anne wire in red
 -Anne wire in black
 -Crochet needle to 1.75mm
 -Sewing needle
 -Cola relief for fabric : Black and white

( If you want a larger ladybug use Duna wire for example ... )

01 - Start with 8 little chains and close with slip stitch .


02 - make 14 points and not finish with slip stitch. See the second image after the 14th lowest point we will start the second round already taking the two wires of the first point, we will work in a spiral without end ... always turns spiral, this way will shut and ends with only one low.


03 - Cut the wire, insert the needle through the initial hole and pull the left over to the inside.


04 - Finishing this first part of the piece , that looks like this:


05 - Now with black wire Anne'll make the head of the ladybug. Secure with low, circulate throughout the home ringlet with low dot ... not have to worry about making all 14 points, Then make the first round and not finish with slip stitch.


06 - Start the second round in second point down ... make one low point and jump down 1 point each spiral quickly it closes then forming the Ladybird little head.


07 - Cut the wire, insert the needle backwards and pull the yarn left  then making the finish.


08 - is thus:


09 - With black wire pieces we make little antennas and ladybird legs. If you do not hand needle can use the crochet hook to pierce the same wire to each other's pet side as shown in the second image ... just pull the cord. Use glue emphasis on black fabric in fixing the little antennas and legs. To paste and pull the thread over to one side and pass the glue pull for each other and pass the glue and re-position the way that will stay ... so the glue will relief inside the piece making it very secure.


10 - Like the little antennas, is done the legs ... just noted that the legs are always localized  the front of the animal. Do not go putting legs there in the Ladybird's butt


11 - To make the division of wings insert  needle with thread in the center of the head coming out the back of the pet ... position the wire dividing well, tie, cut the thread and hide the remains inside the ladybug.


12 - Use relief glue  to the flecks and eyes. The eyes are firmly centered more on top of the head ... since the flecks has a standard ... just leave pontinhando with own  ink glass.


Now just wait a while for drying and the ladybug is ready !!!


See the fashion of summer 2015 - Veja as tendencias para o verão 2015


 The crochet can already be considered a classic - bikinis, beach wraps , blouses , skirts and crochet short dresses are super charming and make the greatest success, regardless of what the fashion dictates how trend.

For summer 2015 , however, this handmade fashion gets a boost due to the boho trend , which values ​​the story of the fringes and handmade . Kimonos , ponchos, jackets , dresses and crochet blouses are pieces that have everything to give super right in 2015 , on or off the beaches.

Since the bikinis and swimsuits are even more charming when they win crochet details such as cutouts on the sides and bangs. Check out some crochet inspirations for summer 2015

Crochet bikini .

O crochet já pode ser considerado um clássico - biquínis, saídas de praia , blusas , saias e vestidos curtos crochê são super charmoso e fazer o maior sucesso , independentemente do que a moda dita como tendência.

Para o verão de 2015, no entanto, esta forma artesanal recebe um impulso devido à tendência boho , que valoriza a história das franjas e artesanal . Quimonos , ponchos , casacos, vestidos e blusas de crochê são peças que têm tudo para dar certo Super em 2015 , dentro ou fora das praias.

Uma vez que os biquínis e maiôs são ainda mais encantador quando eles ganham detalhes de crochê , como recortes nas laterais e franja. Confira algumas inspirações de crochê para o verão 2015